

Off-road tour difficulty levels: your practical guide
A difficulty level on an off-road tour is a shorthand for four things at once: the terrain you will face, the physical stamina required, how far you will be from help, and what your vehicle must be capable of. Get the match right and you have an epic day out. Get it wrong and you are the person being recovered by a support crew.
Here is a quick self-assessment to find your starting point:
- Absolute beginner (no off-road experience, hire car or standard AWD): start at Level 1 or 2, guided only.
- Intermediate (some gravel or light trail experience, standard 4WD): Level 2 or 3, guided recommended.
- Experienced (regular off-road driving, high-clearance 4WD, recovery kit): Level 3 or 4.
- Expert (modified rig, winch, recovery training, expedition experience): Level 4 or above.
Industry rating systems such as the onX Offroad numeric and colour/symbol scales and the Trails Offroad 1–10 technical guide are the most widely used references for understanding what each number actually means on the ground.
Key takeaways
Matching your skill, vehicle, and group to the right difficulty level is the single most important decision you make before booking an off-road tour.
| Point | Details |
|---|---|
| Start one level lower | Choose the lowest level you can complete with margin; step up only after guided practice. |
| Drivetrain determines access | AWD suits Levels 1–2; high-clearance 4WD with all-terrain tyres is the minimum for Level 3. |
| Guided tours lower effective difficulty | A coached guide reduces your real risk by one level through line choice and real-time instruction. |
| Remoteness is a cost and a risk | Higher levels mean longer emergency response times; insist operators carry sat-com and a rescue plan. |
| Weather changes everything | Ratings assume dry conditions; rain can raise a trail’s effective difficulty instantly. |
Table of Contents
- Off-road tour difficulty levels explained: level-by-level breakdown
- How do you choose the right difficulty for your trip?
- What vehicle and equipment do you actually need?
- How operator coaching changes what you can safely attempt
- What does a typical guided tour day look like?
- How to vet an operator before you book
- Your pre-trip checklist
- My honest view on stepping up levels safely
- Sources
Off-road tour difficulty levels explained: level-by-level breakdown
The table below maps each level to the terrain, vehicle baseline, fitness demand, and how remote you will be from services.
| Level | Typical terrain | Vehicle baseline | Fitness demand | Remoteness |
|---|---|---|---|---|
| 1 | Graded gravel, firm dirt tracks | Stock AWD or 2WD | Low | Near services, short duration |
| 2 | Loose gravel, shallow ruts, gentle slopes | Stock AWD or light 4WD | Low to moderate | Typically within a short drive from services |
| 3 | Rocky tracks, moderate ruts, water crossings | High-clearance 4WD, all-terrain tyres | Moderate | Typically a moderate distance from services |
| 4 | Large rocks, steep climbs, deep mud, off-camber | Modified 4WD, lockers, recovery kit | High | 1–2 hours from services |
| 5 | Extreme obstacles, boulder fields, expedition terrain | Heavily modified rig, winch, full recovery | Very high | Often several hours or more from services |
Ratings assume dry conditions. Rain can push a Level 2 trail to a Level 3 or higher within hours, so always check current trail status before you go.
Level 1 suits a family in a hire car on a scenic gravel road. No special skill needed, and services are close.
Level 2 introduces loose surfaces and gentle climbs. A standard AWD handles it, but you will feel the difference from tarmac. Offroading until they have built genuine vehicle experience.
Pro Tip: At Level 2, practise smooth throttle control on loose gravel before you attempt anything steeper. Sudden acceleration is the most common cause of slides.
Level 3 is where drivetrain and ground clearance start to matter. A stock SUV with road tyres will struggle with rocky tracks and water crossings. All-terrain tyres and a proper 4WD low-range setting are the minimum.
Level 4 demands a modified vehicle, recovery gear, and a co-driver who can spot lines. Steep off-camber sections and deep mud holes are normal. This is not a day for solo driving.
Level 5 is expedition territory. Think boulder fields, river crossings, and terrain where a winch is not optional kit but a necessity. Trails Offroad’s technical guide describes Level 10 (the top of their 1–10 scale) as requiring highly modified builds and warns that even experienced drivers should not attempt extreme ratings without a full support party.
How do you choose the right difficulty for your trip?
Start one level below what you think you can handle. That margin for error is what keeps a fun day from becoming a rescue operation.
Work through this checklist in order:
- How many hours of off-road seat time do you have? Zero to five hours puts you firmly at Level 1–2. Ten or more hours of mixed terrain opens Level 3.
- What is your vehicle’s ground clearance and drivetrain? AWD with road tyres: Levels 1–2 only. High-clearance 4WD with all-terrain tyres: up to Level 3. Modified 4WD with lockers and a recovery kit: Level 4.
- How fit is your group? Higher levels mean longer days, more physical jolting, and potentially carrying gear. A mixed group with varying fitness should default to the lowest common denominator.
- How comfortable are you being remote? BRP Experiences’ difficulty scheme highlights remoteness and stamina as the critical factors that separate moderate from difficult adventures. If the idea of being an hour from the nearest town makes you anxious, stay at Level 2 or below.
- Guided or self-drive? A guided tour with an experienced operator lowers your effective difficulty by one level because the guide chooses lines, times obstacles, and coaches you in real time. Self-drive places full responsibility on your party.
Novice with an AWD hire car: Level 1 guided tour, full stop. Experienced 4×4 owner with recovery kit: Level 3 or 4, guided on unfamiliar terrain. Small family on a first off-road holiday: Level 1–2 guided, with a reputable operator who provides coaching.
What vehicle and equipment do you actually need?
Drivetrain and ground clearance are the two features that most directly determine which levels you can safely attempt. Everything else is secondary.

| Vehicle type | Suitable levels | Key limitation |
|---|---|---|
| Standard AWD (road tyres) | 1–2 | Low clearance, no low-range |
| High-clearance 4WD (all-terrain tyres) | 2–3 | No lockers, limited recovery |
| Standard 4WD with recovery kit | 3–4 | May lack winch or skid plates |
| Modified 4WD (lockers, winch, skid plates) | 4–5 | Cost and specialist knowledge |
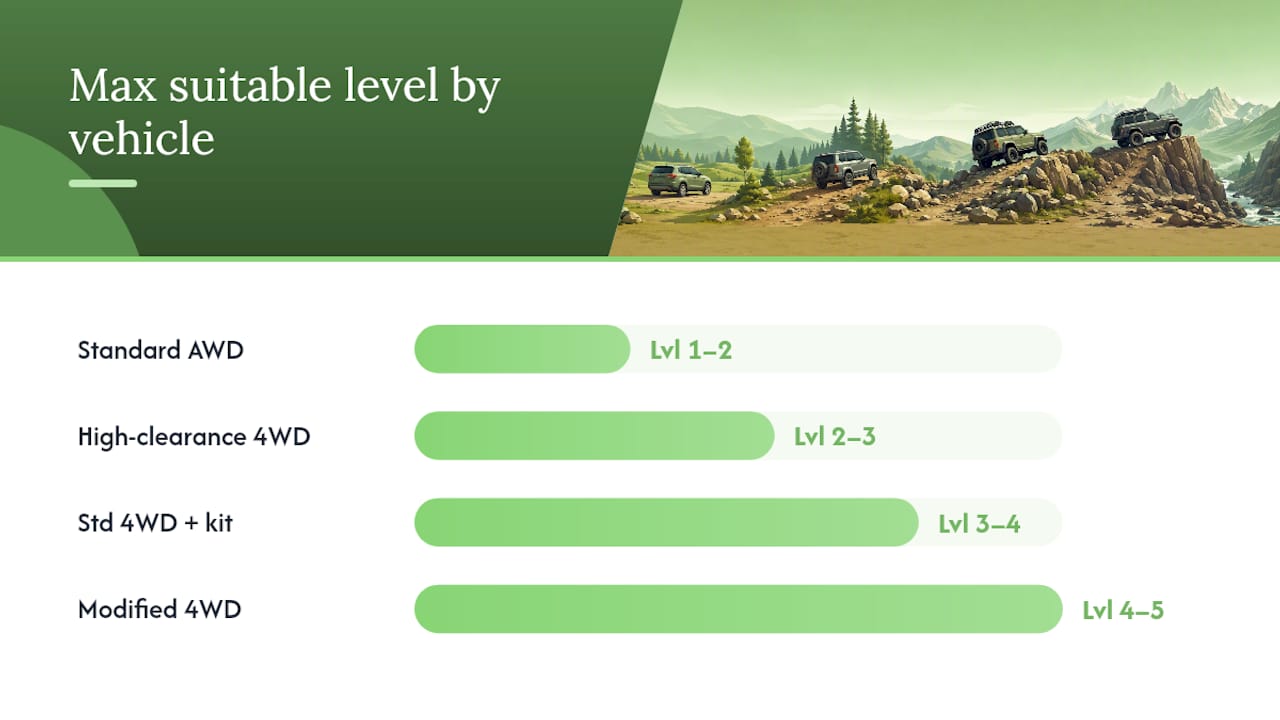
Industry expert Fred Ginsburg warns that AWD is often unsuitable for true technical off-road terrain where high-clearance 4WD with low-range is the minimum safe baseline.
Beyond the vehicle, your equipment list should grow with the level. For Levels 1–2, a basic first-aid kit and a charged phone are enough. From Level 3 upwards, insist that your operator or your own kit includes: a tow strap and shackles, a hi-lift jack, a tyre repair kit, a satellite communicator (where mobile signal is unreliable), and sufficient water and food for twice the planned duration. At Level 4 and above, a winch and a full recovery board set are not optional.
For guided UTV and ATV tours, well-run off-road UTV operators provide vehicle orientation and safety briefings that make even Level 2 terrain accessible to complete beginners, provided the route is matched to the vehicle’s capability.
How operator coaching changes what you can safely attempt
Guided, coach-led instruction reliably expands what a novice can attempt. A good guide does not just lead the convoy; they teach you to read terrain, choose a line, and manage traction before you reach the hard section.
Reputable operators typically include:
- Vehicle orientation: controls, low-range engagement, diff-lock use.
- Line-spotting: how to read a rocky section or a rut before you drive it.
- Sand and mud technique: momentum management, tyre pressure adjustments.
- Basic recovery: how to use a tow strap safely if you get stuck.
- Wheel placement drills: keeping tyres on firm ground across off-camber sections.
Motorrad Adventures’ graded tour system embeds pre-ride skills coaching into higher-grade tours precisely because operator support is what makes those grades achievable for riders who prepare properly. The same principle applies to 4WD and ATV tours.
Pro Tip: Book a half-day skills session before your first Level 3 or above tour. Two hours of coached seat time on a training circuit is worth more than reading ten guides.
Weather is the wildcard. Rain can turn a firm Level 2 trail into a slippery Level 3 within an hour. Responsible operators monitor forecasts and will reschedule rather than push into unsafe conditions.
What does a typical guided tour day look like?
Higher difficulty usually means a longer day, more time away from services, and higher logistics costs. Plan accordingly.
A well-structured guided tour follows a consistent pattern: safety briefing and vehicle orientation (30–45 minutes), a warm-up section on easier terrain, progressively harder sections as the group builds confidence, a mid-point rest with food and water, and a debrief at the end. That structure is deliberate. It lets guides assess the group’s ability before committing to harder terrain.
Logistics costs rise sharply at Level 4 and above: fuel consumption increases, support crew are needed, and recovery equipment must be trailered. Expect to pay more for a well-supported high-difficulty tour, and treat a suspiciously cheap Level 4 offering as a red flag. For remote mountain or jungle terrain, operators like Altai Resort demonstrate what proper support infrastructure looks like in genuinely remote environments.
How to vet an operator before you book
Choose operators who publish clear difficulty definitions, specify their vehicle standards, and explain their safety and rescue systems. Vague language about “challenging terrain” with no specifics is a warning sign.
| What to ask | What a good answer looks like | Red flag |
|---|---|---|
| How do you define your difficulty levels? | Written definitions with terrain examples | “It depends on the day” |
| What vehicles do you use and what is their spec? | Named model, clearance, tyres, recovery kit | No specifics given |
| What is your guide-to-guest ratio? | 1:4 for technical terrain | “As many as needed” |
| What happens if someone gets stuck or injured? | Named rescue plan, sat-com, first-aider on tour | “We’ll sort it out” |
| Is training included? | Pre-ride briefing and coached warm-up | Briefing is optional |
No clear difficulty definitions, vague recovery arrangements, and no mention of a local rescue plan are the three biggest red flags. Walk away.
Your pre-trip checklist
Small omissions are the most common cause of on-trail rescues. Run through this before every trip.
Personal and documentation:
- Valid driving licence (and international permit if required)
- Travel insurance covering off-road activities
- Any medical notes or medication (inform your guide of conditions)
- Emergency contact details stored offline
Clothing and PPE:
- Helmet (mandatory for ATV and UTV tours)
- Gloves and closed-toe shoes or boots
- Long trousers and a long-sleeved layer (sun, dust, and scrapes)
- Sunscreen and sunglasses
Vehicle and recovery (self-drive):
- Tyre pressures checked and adjusted for terrain
- Fuel full, plus a spare jerry can for Level 3 and above
- Tow strap, shackles, and a hi-lift jack
- Tyre repair kit and a spare wheel
Communications:
- Charged mobile phone with offline maps downloaded
- Satellite communicator for Level 3 and above
- Tour operator’s emergency number saved
Pro Tip: Download your route to an offline mapping app the night before. Mobile signal disappears fast once you leave the main road, and a paper map of the area is a sensible backup.
My honest view on stepping up levels safely
The most common mistake adventure seekers make is jumping two levels at once because they had a great time on an easy tour. Progression should be incremental: one level at a time, with coached practice in between. Build your seat time on guided tours before you attempt self-drive on technical terrain. The guide’s real-time coaching is worth far more than any amount of pre-trip reading, including this article.
Operator quality matters as much as your own skill. A well-coached Level 3 tour with a reputable operator is safer and more enjoyable than a poorly supported Level 2 self-drive. Look for operators who treat the briefing as seriously as the drive itself, and who will genuinely turn a group around if conditions deteriorate.
Sources
Before you book, check current trail status, recent ride reports, and local weather. Ratings are conditional, not permanent.
- How to Read Off‑Road Trail Difficulty Ratings | onX Offroad
- Technical Ratings – How We Grade Trails | Trails Offroad
- Offroading
- Adventure Bike Tour Grading | Motorrad Adventures
- Defining Adventure Difficulty Levels – BRP Experiences


